Green Buildings – NACHI excerpts
Many new buildings have features such as passive solar design, photovoltaic systems and solar thermal systems. With the new energy awareness that has been created and the governments involvement in promoting green energy saving concepts, green will be introduced to more homes and systems. The energy consumed by homes if roughly 40% in the United States of America and will become a principal target for controlling sky-rocketing energy costs. Up to 85% of the energy used today is non-renewable and is not projected to change in the foreseeable future.
Passive design refers to home design which uses natural methods of heating and cooling, and which requires few or no mechanical devices and minimal or no consumption of other fuel.
Heating
Passive solar heating uses the sun’s energy to heat a home. Typically, the home is designed and oriented to collect sunshine through large, south-facing windows. Sunlight shines into the home onto materials with high thermal mass , such as concrete, masonry or stone, which absorb sunshine and store it as heat, slowly releasing it over time to warm the home interior.
Active solar heating uses the sun’s energy to heat a home, but heat is distributed through the home with the help of mechanical equipment such as fans, requiring the use of some electricity.
Green Improvements
LOW-FLOW TOILETS
Toilets consume 30% to 40% of the total water used in homes, making them the biggest water users. Replacing an older 3.5-gallon toilet with a modern, low-flow 1.6-gallon toilet can save an average of two gallons-per-flush (gpf), or 12,000 gallons of water per year. Low-flow toilets usually have 1.6 gpf marked on the bowl behind the seat or marked inside the tank.
Another method for reducing the volume of water used with each flush is to install a water-filled plastic bag (called a displacement bag ) in the water tank. The old version of the displacement bag was a brick.
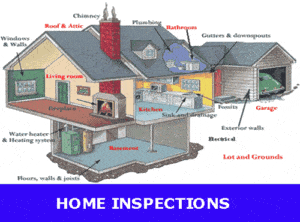
Protecting the Home Foundation
Moisture allowed to penetrate next to the foundation can cause several problems:
Softening the soil : Moist soil may be less able to support the weight of the structure above. Ontario Building Code requires larger footings in moist or un-disturbed soil.
Expansive soil : Certain types of soil, especially certain types of clay, expand to many times their original size as they absorb moisture. Expansive soil can easily damage foundations.
Foundation undermining : E nough moisture flowing under a foundation can carry away soil and leave the foundation unsupported in areas.
Microbial growth : Moisture allowed to collect in crawlspaces and basements may create conditions which encourage the growth of microbes such as mould fungus and soil-borne bacteria which may represent potential health hazards.
Slope Grade Away from Foundation
Grade around the home perimeter should slope away from the foundation for at least six feet. The slope should effectively route surface run-off away from the foundation.
Hillside Run-Off
Homes built on hillsides should have a feature installed which will route surface runoff away from the foundation. Swales and drainage ditches are two commonly used methods.
Planting Beds
Planting beds located next to the home may create problems by holding moisture next to the foundation.
Downspouts
To minimize erosion and route run-off away from the foundation, downspouts should have extensions or should terminate at a perimeter drain or splashblock. Some method should be used to prevent erosion.
Engineered Lumber
Engineered wood products use recycled/reconstituted wood chips or strands and finger-jointing (the process of gluing larger pieces of wood together) to produce a variety of building products such as structural framing lumber and trim material.
Waste wood and entire trees can be used to produce products, regardless of species and age.
Engineered wood is generally straighter, more stable and more structurally consistent than dimensional lumber. In joist and rafter applications, the reconstituted products are particularly useful because they can span long distances with less sagging than similarly-sized conventional lumber.
Cost
Engineered wood is generally more expensive than dimensional lumber, but cost is offset to some degree by labor savings and improved quality.
Types of Engineered Lumber
Oriented Strand Board (OSB)
OSB has replaced plywood in many applications. It is manufactured using waterproof heat-cured adhesives and rectangular-shaped, aligned wood strands. Strand direction changes in each layer in a manner similar to the way the veneers within a sheet of plywood alternate direction. This results in a structural engineered wood panel that shares many of the strength and performance characteristics of plywood
Finger-jointed Studs
Finger-jointed studs are manufactured by milling tightly-fitted joints into short pieces of lumber which would otherwise be considered scrap. These short pieces are glued together using a method that creates joints that are stronger than the wood. Joints will lose strength, though, if material is not protected from weather.
I-beams
I-beams are framing members typically used as floor joists and sometimes as rafters. They are “I” shaped in cross section, dimensionally stable, available in a variety of structural ratings and are produced in lengths up to 60 feet. They consist of a plywood or oriented strand board (OSB) web to which a top and bottom chord is attached, usually either 2 x 2, 2 x 3 or 2 x 4, depending on the structural rating of the I-beam.
Microlams
To produce Microlam® Laminated Veneer Lumber (LVL), sheets of veneer peeled from logs are carefully dried, ultrasonically graded for strength, and evaluated to ensure uniform thickness and moisture content. The sheets are coated with adhesive, layered, and subjected to heat and pressure to achieve a permanent bond. As with I-beams, Microlams are available in long lengths.
Glu-Lams
Glu-Lams are beams manufactured by gluing together layers of dimensional lumber. Engineered beams are typically more stable and stronger than similar sized dimensional beams and can be manufactured with a camber . Glu-Lam beams can also be manufactured in large sizes which would be much more expensive if milled from a solid piece of wood. Glu-Lams are often left exposed. Building beams by laminating smaller pieces of dimensional lumber allows for more efficient use of wood and helps save trees.
Parallams
Parallams are engineered wood beams manufactured by gluing together aligned wood strands and bonding them using a microwave process.
Wall Framing
Wood and steel wall framing members act as thermal bridge s in transmitting heat through the building envelope. Value engineering uses two methods for reducing heat transfer from thermal bridging.
A thermal break is a layer of insulation which interrupts the conduction of heat through building envelope framing members.
Reducing the number of framing members in the building envelope. By installing studs on 24-inch centers instead of 16-inch centers, fewer studs are used, which means a greater percentage of the overall exterior wall, floor or roof cavities will be filled with insulation.
Structural Insulated Panels (SIP’s)
Structural insulated panels are high performance building panels used in floors, walls, and roofs in residential and light commercial buildings. They are an alternative to conventional framing methods.
The panels are made by sandwiching a core of rigid foam plastic insulation between two structural skins of oriented strand board (OSB). Other skin material can be used for specific purposes. SIPs are manufactured under factory-controlled conditions and can be custom designed for each home. The result is a building system that is extremely strong and energy efficient because there are no wall studs to transmit home heat to the outside. Panels are available in a variety of sizes, thicknesses and core/skin materials.
Insulating Concrete Forms (ICFs)
Insulating concrete forms are forms for poured concrete walls which are designed to remain in place as a permanent part of the wall assembly.
The forms, made of a foam similar to Styrofoam, are made up of pre-formed, hollow, interlocking blocks. As blocks are assembled, rebar is installed, and then concrete is poured to fill the cavities, so that once the concrete is dry it forms a post and beam grid inside the blocks.
In addition to providing a continuous insulation and sound barrier, the foam forms have plastic strips embedded which provide a means for attaching interior and exterior wall coverings.
Insulation
Insulation is rated by its thermal resistance, called R-value, which indicates its resistance to heat flow. Higher R-values indicate greater effectiveness at reducing heat flow. The R-value of thermal insulation depends on the type of insulating material, its thickness and its density. Installing more insulation in a home increases its R-value and helps keep heat from moving through the building envelope.
The total wall assembly R-value will depend upon what materials are installed in the wall, floor or roof assembly , not just the R-value of the insulation. In calculating the R-value of a multiple-layered wall, floor or roof assembly , the R-values of the individual layers are added together. The R-value of a wall assembly is also affected by the quality of the installation and the properties of the insulation material.
To a certain extent, more tightly-packed wall cavities will allow less air-flow through the wall assembly, which reduces the amount of heat flow since air carries heat.
Insulation packed too tightly will lose some of its effectiveness because most insulation works by trapping air in microscopic air pockets. When these tiny pockets are crushed, R-value is reduced.
Insulation is also affected by thermal bridging . Thermal bridging commonly occurs where framing members in the building envelope interrupt the insulation. Wood studs have an R-value of approximately R-1 per inch. Fibreglass insulation is approximately R-3.3 per inch. This means that studs will conduct heat through the wall more quickly than the insulation, forming a thermal “bridge” between the conditioned air interior and the exterior.
Because heat rises, ceilings and attics typically have more insulation installed than walls or floors
Air Movement in Buildings
The building envelope consists of those parts of the floor, wall and roof assemblies designed to control the loss of conditioned air. Conditioned air refers to air which has been warmed, cooled or had moisture added to or removed from it.
Building science refers to the study of how moisture, heat and air move through buildings and how their movement affects human health, comfort and the cost of operating homes. Air movement is an important influence on indoor environments because air commonly moves across building envelopes. We want to keep control of indoor air quality, and air movement across the building envelope has the potential to affect the quality of indoor air dramatically.
Circular air movement occuring within a building envelope is called circulation. Air movement across the building envelope is called infiltration if air is moving into the conditioned space and exfiltration if it is moving out.
Air movement in a home can create uncomfortable moisture or temperature levels, or introduce dust, pollen, mold spores, radon or other pollutants or health hazards into indoor air.
INDOOR AIR MOVEMENT
Air movement through the building envelope is caused by the following:
Depressurization of buildings by mechanical ventilation devices and the combustion process.
Poorly-balanced HVAC systems –heating and cooling equipment both use blowers to distribute conditioned air throughout buildings. Depending on how well the system is balanced, this can establish air pressure differences in various parts of a building, which can cause air to move in or out through the building envelope.
Ventilation fans for bathrooms, laundries and range hoods all push conditioned air to the outside which must be replaced. Typically, this make-up air has come from air infiltration around doors and windows and through other gaps in the building envelope.
Combustion processes in appliances such as boilers, furnaces, heating stoves and water heaters. They pull air from the home interior as they exhaust the products of combustion to the exterior.
Temperature differentials between indoor and outdoor air.
Thermal buoyancy describes the action of air as it is warms. Because heated air is less dense it rises, moving from a cool, high-density area toward a warm, low-density area.
Stack effect describes the action of warm air rising through a building. As warm air rises, it pulls cold make-up air into the home through the lower building envelope and pushes warm air out through the upper building envelope. This can have a significant effect on homes, pulling undesirable hot or cold air, moisture or environmental pollutants and hazards (radon) into the home.
Convection currents , or the movement of cooler air being pulled in to replace rising warm air, will establish convection currents at any place in the home in which significant temperature differences exist. This occurs mainly in living space and attics. Supply and return registers are key points of temperature differences, but also key points of pressure differences caused by Make-Up Air
As air is exhausted from the home by the methods mentioned above, it must be replaced by make-up air. Unless ventilation devices are deliberately installed to provide make-up air, it will be pulled into the home through the building envelope. Uncontrolled make-up air may carry with it excessive moisture or heat (or lack of heat). It may infiltrate from the exterior, the crawlspace or the attic.
In extremely tightly built homes, make-up air has been supplied from sewers after water was sucked out of the plumbing traps. Installing a Heat Recovery Ventilator (HRV) or Energy Recovery Ventilator (ERV) offers more control over the supply of make-up air, allows for more efficient use of heating and cooling equipment and reduces heating and cooling costs
Heat and Energy Recovery Ventilators
Inspecting HRVs and ERVs lies beyond the scope of a General Home Inspection, but inspectors should be able to recognize them.
HRVs use a heat exchanger to transfer heat between home exhaust-air and make-up air without allowing the two airstreams to mix. This exchange pre-warms (or pre-cools) make-up air, which in turn lowers heating and cooling costs.
ERVs perform the same function but in addition, they also transfer moisture. Systems are available in different sizes in order to maintain as closely as possible an ideal 3.5 air changes per hour .
HRVs and ERVs are typically installed in line with the home heating/cooling ducts and may include filtration devices such as High Efficiency Particulate Air (HEPA) filters.
Air Barriers
Air barriers are assemblies or components designed to resist the flow of air through the building envelope by resisting air pressure differences. They may consist of sealed drywall, exterior wall sheathing or even tightly-packed insulation (sprayed cellulose or foam). They may be installed anywhere in the wall, floor or ceiling assembly, and toward the exterior or interior.
Air barriers should be:
- impermeable to air flow.
- continuous around the entire building or living space perimeter.
- permeable to water vapor–moisture impermeable barriers may cause condensation problems.
- substantial enough to withstand the forces that may act on them during and after construction.
- durable over the projected lifetime of the building.
Photovoltaic (PV) Systems
Photovoltaic (PV) is the term used to describe systems which convert sunlight directly into electricity. To collect sunlight, PV systems use either panels or shingles, although panels are much more common. Individual PV panels are called “modules” and a number of modules can be mounted together on racks to form an “array.”
An array may consist of modules connected together in a single string, or modules may be connected to form several strings within the array. This is important because shading one module in a string will shut down the rest of the modules in that string. If all the modules in an entire array are connected to form only one string, the entire array could be shut down by shading one module.
PV systems have no moving parts, have 20-year plus lifespans and no negative environmental impact once they’re installed. Typical panels are now around 15% efficient, although panels not yet publicly available approach 30% efficiency.
To help avoid this problem, some systems provide a “combiner box” in which electrical connections for individual modules are made inside an electrical panel mounted in an easily accessible.
Two types of PV systems are available, grid-tie and battery back-up.
GRID-TIE SYSTEMS
A “grid-tie” system is one in which, in a home conventionally connected to utility company power supplies, a special electric meter is installed which can spin both forward and backward, often called a “net meter”. When the PV system is producing more power than the home uses, the meter will spin in reverse. Utility companies review the results annually and if the system owner has produced more electricity than they have used, they typically receive compensation. Compensation agreements between PV system owners and utility companies vary.
It is typical for the utility to sell electricity to consumers at a price of, as an example, 11 cents per Kilowatt hour (KWh), but will pay only a wholesale price of 4 cents per KWh to PV system owners who produce an annual surplus.
One of the disadvantages of the grid-tie system is that if the home loses power from the utility company, the PV system is designed to shut down automatically also, meaning that the home will be without electricity as long as no power is supplied from the utility provider. This feature is designed to protect utility employees working on power lines, since power from the PV system not used at the home goes out the service wires, through the transformer on the pole and into the utility companies’ electrical distribution system.
Inspection of PV Systems
Complete inspection of a PV system requires a qualified specialist. PV systems can produce lethal amperages and home inspectors without special training specific to PV should under no circumstances imply that they perform complete PV inspections. Proper grounding and bonding methods are crucial, line-side taps are not unusual and dangerous conditions my not be obvious to inspectors who feel comfortable inspecting conventional home electrical systems but are not PV-qualified.
Lighting: Bulb and Fixture Types
Energy Use in Home Lighting
Lighting accounts for 30% to 50% of a building’s energy use, or about 17% of total annual U.S. electricity consumption. Ninety percent of the energy emitted by incandescent bulbs is in the form of heat, and only 10% is in the form of light. This means that not only is money wasted on inefficient lighting, but using incandescent bulbs lights increases cooling costs.
There are many ways to build Green and with the change in our economy the government will be funding more efficient means of conserving energy. Ontario’s Premier has already indicated that they will not allow NIMBY’s ( Not In My Back Yard) to influence siting of energy saving or green initiatives. The wind turbines being located off the Scarborough bluffs is an example of Ontario’s determination to move forward with Green projects.
For Wood Burning information visit WETT Inspections