705-795-8255 Roger@napoleon.cc
Air Barriers and Moisture in Your Home

Air Barriers and Moisture in Your Home

Why a House Needs an Air Barrier

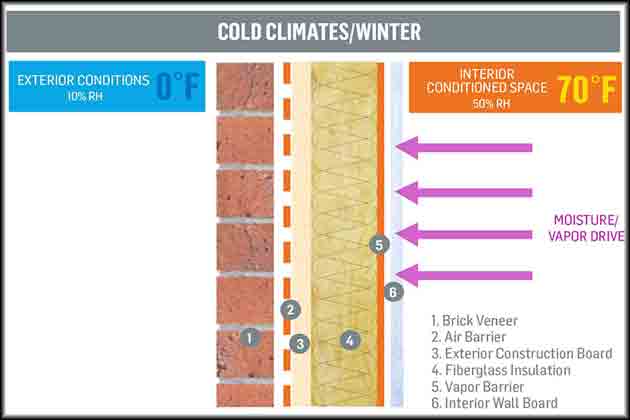
An effective air barrier regulates the indoor climate by preventing the transfer of air (and the moisture attached to it) between the exterior and interior of a home. An air barrier must also stand up to the air pressure differences acting on them. They stop air from transporting moisture to the interior of a wall assembly, preventing condensation and the damaging effects of moisture accumulation. They are essential to waterproofing new foundation walls.

Four vital features of a high-quality air barrier include:Air-Barrier-&-Vapour-Barrier

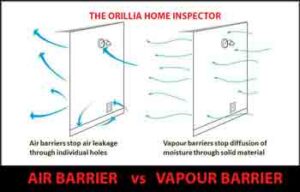
  1. Structural integrity (durability) over the expected lifetime of the home
  2. Continuous over the entire home’s building enclosure
  3. Impermeable to airflow
  4. The strength and stiffness to withstand forces acting on them during and after construction

Air Barrier – Its Design and Purpose

In Ontario the air barrier in a home is installed under the authority of the Ontario Building 9.25.4.3. Installation of Vapour Barriers

(1) Vapour barriers shall be installed to protect the entire surfaces of thermally insulated wall,
ceiling and floor assemblies.
(2) Vapour barriers shall be installed sufficiently close to the warm side of insulation to prevent
condensation at design conditions.

Where a vapour retarder is employed, the opposite wall surface must provide a permeable surface to allow drying to occur. Thus, in hot, humid, cooling climates, where a vapor retarder is employed at the exterior, the interior wall surfaces should be permeable. Novapor retarder paints, kraft-faced insulation, or vinyl wall coverings should be used. Conversely, in northern heating climates, with interior vapour retarders, the exterior wall coverings should be vapour permeable. This simply means that in warmer climates where cooling is the main concern, the vapour barrier would be installed on the outside of the insulation.

House wraps are a permeable surface which, while protecting your home from the elements allows moisture to pass. This allows any moisture that is between your vapour barrier and house wrap can escape and evaporate rather than collecting in your wall system. The primary attribute of house wraps is their ability to operate as air infiltration barriers while not forming an impervious vapour barrier. When placed over the exterior surface of the wall sheathing, the material allows moisture vapour to escape from the frame wall cavity while reducing convective air movement in the insulation, thereby helping to maintain the composite R-value of the wall.

The Dew Point of your house is the area where warm moist air will convert to moisture. The dewpoint is a measure of atmospheric moisture. It is the temperature at which air must be cooled in order to reach saturation (assuming that air pressure and moisture content are constant). As the surface of the earth cools at night, warm moist air near the ground is chilled and water vapour in the air condenses into droplets on the grass and other objects. Dew is particularly heavy on clear nights, when the earth cools rapidly. When a blanket of cloud insulates the earth, the cooling rate is slower. The greater the difference between the temperature and the dew point, the drier the air.  Depending on the season and the time of day the Dew Point can range anywhere from 15 deg C to 19 deg C.

When warm moist air infiltrates your vapour barrier, and passes through to your exterior wall, when it meets a cold surface or void, moisture is created as it cooled to its dew point. This can cause wet insulation, frost on exterior walls and in some cases even mould.

Prevention is possible by ensuring all your insulation is covered by a vapour barrier, most codes call for a minimum of 6 mm poly, and all penetrations are overlapped and taped by Tuck tape, the red tape not the silver duct tape of Red Green fame. All electrical boxes, windows, switches, and vent penetrations should be tightly sealed.

Basements are more susceptible to breaks in vapour barriers due to the fact that most services are located there and many installers fail to replace insulation and repair holes in vapour barriers etc. This can be increased if you have laundry facilities located in your basement and an open sump hole which contains water.

Humidity is the main factor of the creation of moisture and if you live in a climate where the humidity is less than 35% this would not be an issue for you. So if you have high humidity using a dehumidifier in your basement can alleviate these moisture problems.

Buying a Century Home?  Roger has inspected hundreds of Century Homes –  Read article on Century Home Inspections

The Orillia Home Inspector

For more information on Air Quality Testing call Roger at 705-795-8255

Send Roger an Email   roger@orilliahomeinspector.com

We also offer Asbestos Testing  Air Quality Testing  WETT Inspections and Free Thermal Imaging with every Inspection

100% Money Back Guarantee on All our Inspection services

Crawl Space – Proper Insulation is Required

EFFECTIVE CRAWLSPACE INSULATION

A properly sealed, moisture-protected, and insulated crawlspace will increase comfort, save on energy costs, improve the durability of the home, and reduce entry of moisture, radon, and other potential irritants or pollutants into the home. Whichever design is followed, the keys to an effective crawlspace are:

Moisture control – using water- managed foundation system to drain rainwater and groundwater away from foundations.

Airtight construction – sealing all air leaks between conditioned space and the outside prior to insulation installation.

Complete insulation coverage – properly installing the correct insulation levels and making sure the insulation coverage is continuous and complete.

Water-Managed Foundation System
A crawlspace is susceptible to moisture and deterioration problems because of contact with the earth. The best approaches for preventing these problems will depend on the local climate and style of construction, but the following general rules apply to most crawlspace designs.
1. Keep all untreated wood materials away from the earth.
2. Provide rain drainage, such as gutters, to conduct rainwater away from the house.
3. Slope the earth away from the house for at least 5 feet at a minimum 5% grade ( 3 inches in 5 feet ). Establish drainage swales to direct rainwater around the house.
4. Add a sill gasket to provide air sealing.
5. Install a protective membrane, such as an EPDM-type membrane, to serve as a capillary break that reduces wicking of water from the masonry wall. This membrane, in addition to metal flashing, can serve as a termite shield.
6. Damp proof the below-grad portion of the foundation wall to prevent the wall from absorbing ground moisture by capillary action.
7. Install drainage plane material or gravel against the foundation wall to relieve hydrostatic pressure and channel water to the foundation drain.
8. Provide a foundation drainage system at the bottom of the footing, not on top, when the foundation floor (interior grade) is below the exterior grade. Surround a perforated 4-inch drain pipe with gravel and cover them with filter fabric.
9. Install 6-mil polyethylene across the crawlspace floor to prevent soil moisture from migrating into the crawlspace. Overlap and tape all seams by 12 inches, and seal the polyethylene 6 inches up the crawlspace walls.

CRAWLSPACE WALL INSULATION TECHNIQUES
For years, standard building practice was to insulate underneath the floor over a ventilated, unconditioned crawlspace. A better approach is to build a well sealed, unventilated crawlspace (i.e., build the crawlspace like a basement) by sealing and insulating the foundation walls rather than the subfloor.

Advantages to insulating the crawlspace walls are:
– Problems associated with ventilating the crawlspace are avoided.
– Less insulation is required (around 400 square feet for a 1,000 square foot crawlspace with 3 foot walls).
– Piping and ductwork are within the conditioned volume of the house so they do not require insulation for energy efficiency or protection against freezing.
– Air sealing between the house and crawlspace is less critical.

Disadvantages to insulating the crawlspace are:

– The insulation may be damage by rodents, pests, or water.
– A radon mitigation system will require ventilation of the crawlspace to the exterior. Not planning for radon-resistant construction may necessitate air sealing the floor in order to mitigate the radon through ventilation.
– The crawlspace must be built air tight and the air barrier must be maintained.
– The access door to the crawlspace must be located inside the home through the subfloor unless an airtight, insulated access door in the perimeter wall is built and maintained.

An example of poor insulation and what lack of vapour barrier can do.

STEPS FOR INSTALLING CRAWLSPACE WALL INSULATION

1. Review plans for this method of foundation insulation with pest control and local building officials to ensure code compliance.
2. Eliminate or seal the foundation vents.
3. Ensure that combustion furnaces and water heaters located in the crawlspace are sealed-combustion units equipped with a power combustion system.
4. Seal all air leaks through the exterior wall during and after consturctiom, including the band joist.

STEPS FOR INSTALLING UNDER FLOOR INSULATION

1. During the early phases of construction, meet with the mechanical subcontractors (plumbing, electrical, and heating/cooling) to inform them of the importance of keeping the space between the floor joists as clear as possible. Run drain lines, electrical wiring, and ductwork below the bottom of the insulation so that a continuous layer of insulation can be installed. For protection against freezing, supply plumbing may be located within the insulation. The best approach is to run supply plumbing together in a few joist spaces. The insulation can be split and run around the piping.
2. Seal all air leaks between the conditioned area of the home and the crawlspace. High priority leaks include holes around bathtub drains and other drain lines, plenums for ductwork (including duct boot connections at the floor).
3. Select insulation levels in accordance with the International Energy Conservation Code or the DOE Insulation Fact Sheet.
4. Insulation batts with an attached vapour barrier are usually used to insulate framed floors. Obtain insulation with the proper width for the joist spacing of the floor being insulated. Complete coverage is essential-leave no insulation voids. The batts should be installed flush against the subfloor to eliminate any gaps that may serve as passageways for cold air to flow between the insulation and the subfloor. The batts should be cut to the full length of the joist being insulated and slit to fit around wiring and plumbing. Insulate the band joist area between ducts and the floor as space permits. Use insulation hangers (wire staves) spaced every 12-18 inches to hold the floor insulation in place without compressing the insulation more than one inch.
5. The orientation of the vapour barrier depends on the home’s location. In most of the country, the vapour barrier should face upward. However, in certain regions of the Gulf states and other areas with mild winters and hot summers, it should face downward.
6. Insulate all ductwork in the crawlspace.
7. Insulate all hot and cold water lines in the crawlspace unless they are located with the insulation.
8. Close crawlspace vents after making sure the crawlspace is dry and all construction materials have dried out.

ARE CRAWLSPACE VENTS NECESSARY?

Most building codes require crawlspace vents to aid in removing moisture from the crawlspace. However, many building professionals are now recognizing that an unvented crawlspace (or closing crawlspace vents after the crawlspace has had time to dry out after construction) is the best option in homes using proper moisture control and exterior drainage techniques for two reasons.

First, ventilation in the winter is undesirable in order to keep crawlspaces warmer. Second, warm moist outdoor air is brought into the crawlspace through foundation vents in the summer is often unable to dehumidify a crawlspace and, in fact can lead to increased moisture levels in the crawlspace.

For example, a crawlspace kept cool by the ground in the summer may have a temperature of 60 deg F and 90% RH is about 74 deg F. Thus, outdoor air brought into the crawlspace will actually increase the moisture level until water condenses out on cool crawlspace surfaces such as floor joists, foundation walls, and air-conditioning ducts. As framing stays moist, mold grows and dry rot develops.

Understanding Your Home Inspection